• Skip to primary navigation
  • Skip to main content
  • Skip to primary sidebar

Nourished not Famished

Real-life healthy changes, made simple and delicious.

  • Home
  • Recipes
    • Main Dishes
    • One Pan Dinners
    • Breakfast
    • Salads & Side Dishes
    • Soups & Stews
    • Snacks
    • Sauce/Dressing/Spices
    • Appetizers
    • Desserts
  • Real Food, Real Health
    • Why Real Food works
    • Getting Started
    • Meal Prep/Meal Planning Tips
    • The Other 3: Sleep, Stress Relief, & Movement
  • About
  • Contact
  • My Favorite Things
  • Nav Social Menu

    • Facebook
    • Instagram
    • YouTube

gluten-free

Blueberry and Buckwheat Breakfast Bowl, gluten-free

By Jen

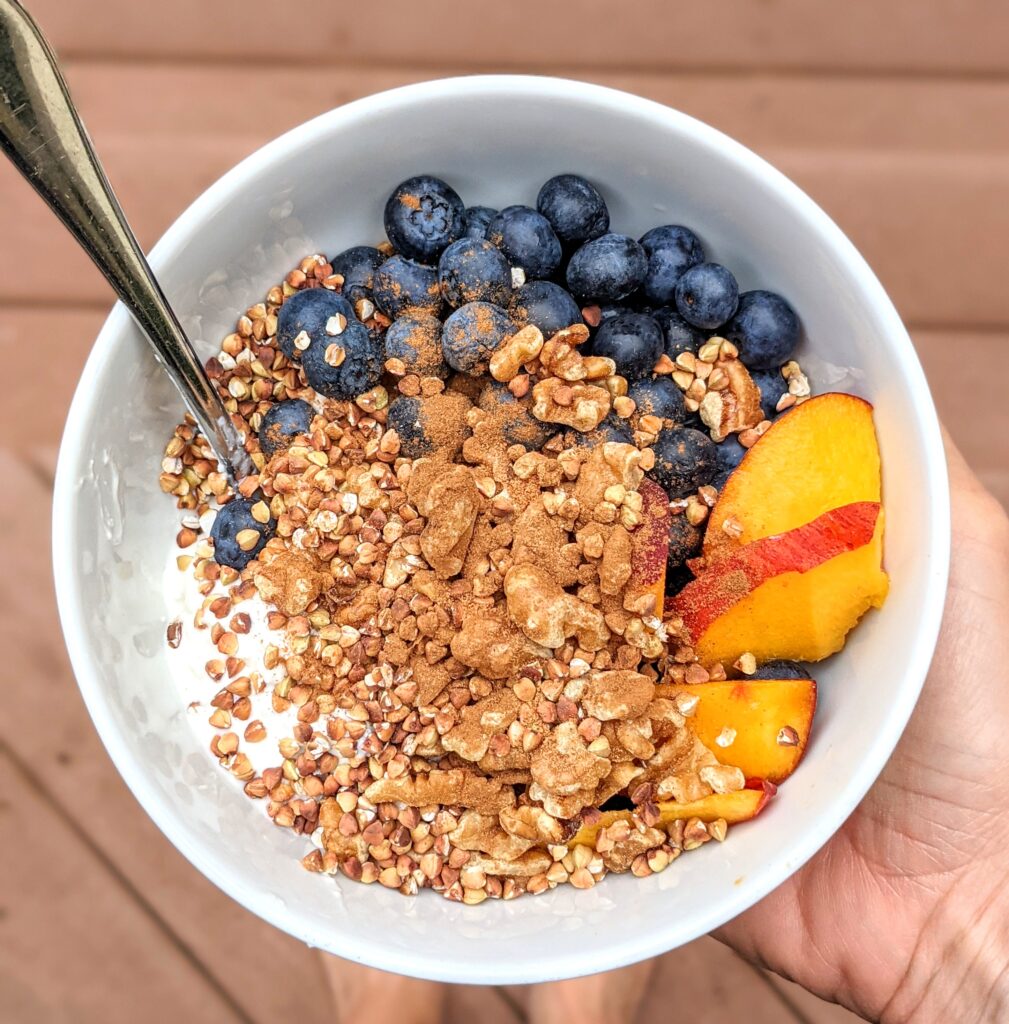
If you’re feeling a little bored with your breakfast lineup, this Blueberry Buckwheat Bowl is the perfect item to bring some excitement back to your morning.

Maybe you’re like me, and you love your oats, eggs, Greek yogurt, and other breakfast classics, but you’re looking for something new to shake things up. This breakfast bowl delivers all the comfort and flavor you want in a breakfast, and leaves you feeling satisfied and energized to make it through your morning.

What makes this a winner:

  • big on flavor, with a satisfying variety of textures, too!
  • colorful, polyphenol-rich fruit (blueberries, or use whatever fruit you like)
  • nourishing fats (toasted walnuts, and here’s why they’re so good for you!)
  • satiating protein (cottage cheese; I like to use Good Culture brand cottage cheese, not only for its amazing flavor, but also because it’s made with simple ingredients and is rich in probiotics.)
  • slow-acting, fiber-rich carbs (the buckwheat groats)

The basics about buckwheat

big bowl of buckwheat

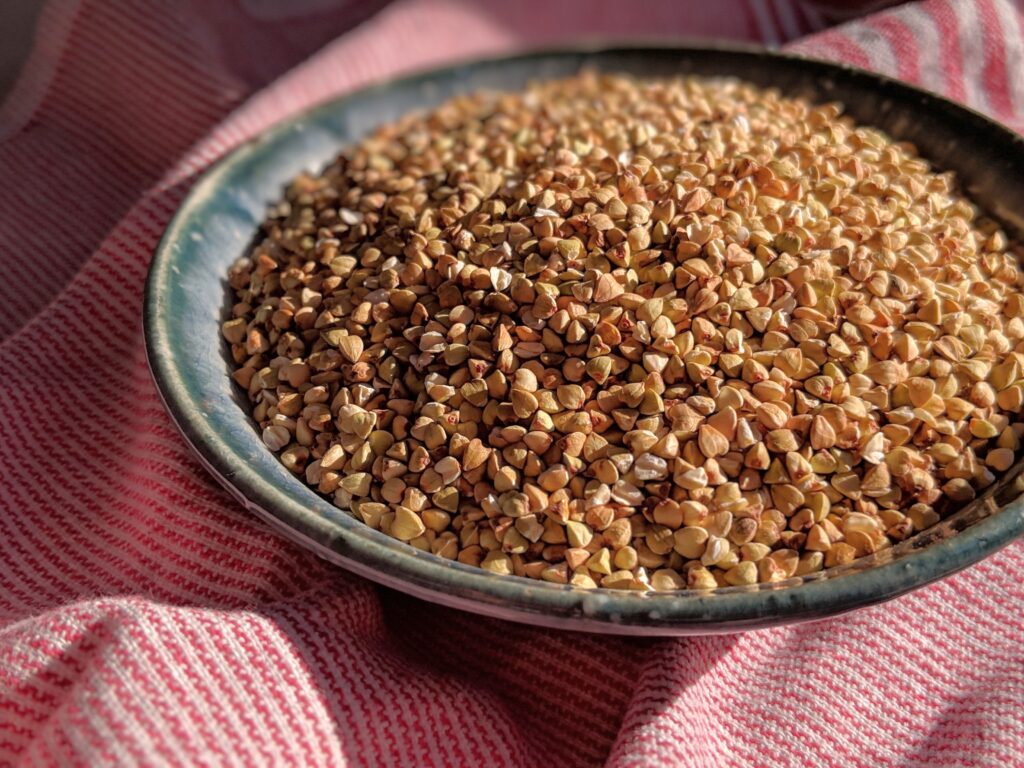
Surprisingly, buckwheat is not a form of wheat, is not a grain, and IS gluten-free.

Buckwheat is actually the seed of a flowering plant, and is known as a “pseudocereal” even though it is typically consumed like a grain. It’s rich in fiber and minerals, and is a slow-acting carb.

What’s the big deal about “slow” carbs? They provide a more steady flow of energy to your body, they help maintain healthier insulin and blood sugar levels, and typically satisfy your hunger longer that more refined carbs do. You can learn more about slow carbs here.

tips to easily batch prep this breakfast bowl

  • When toasting the walnuts and buckwheat, make a much larger batch than necessary for this one bowl meal. Not only will you have plenty to make this meal multiple days in a row (yes, it’s that good!), but you’ll also have enough to add to other meals, too.
  • The toasted walnuts and buckwheat are a great topping for Greek yogurt, or add to a salad for some crunch (plus it also adds nourishing fats and/or carbs depending on your choice of adding walnuts, buckwheat, or both!).
  • Get a few containers ready, and load them up with this recipe. Create single-servings, and you’ll have a convenient breakfast item ready and waiting for you every morning! Need some reliable containers? Check out my favorites here: My favorite kitchen containers and tools

Toasting instructions:

  • To toast the walnuts: Heat oven to 350F. Layer a sheet pan with parchment. Spread out the walnuts in a single layer. Bake 8-10 minutes, checking frequently. Allow to cool before storing. Store in refrigerator to preserve the nutrients and taste of the nourishing fats in the nuts.
  • To toast the buckwheat: Heat a skillet to medium. Add buckwheat groats in a single layer, and stirring frequently, cook for approximately 5 minutes until slightly golden/brown-ish in color. Allow to cool before storing in refrigerator.
Print Recipe
Blueberry and Buckwheat Breakfast Bowl, gluten-free
Course Breakfast
Servings
bowl
Ingredients
  • 3/4 cup blueberries or other fruit of your choice
  • approx. 5 ounces cottage cheese (or 150g; roughly a single serving size as sold in the store)
  • 2 1/2 tablespoons toasted walnuts (see toasting instructions above)
  • 2 tablespoons toasted buckwheat groats (see toasting instructions above)
  • ground cinnamon and ground nutmeg
  • honey, to taste (optional)
Instructions
  1. Combine in a bowl the blueberries, cottage cheese, walnuts, and buckwheat. Sprinkle with cinnamon and nutmeg. Drizzle with honey if desired.

Filed Under: Featured, Recipes Tagged With: batch cooking, gluten-free

Zucchini Fritters with Dipping Sauce, gluten-free

By Jen

stack ’em up and eat those veggies

Finally, you can hit your veggie goals!

The struggle is real. I get it.

You know you should be eating more veggies.

You know you should be feeding yourself and your household more veggies.

You actually like vegetables, but you feel like you’re working way too hard “selling” veggies to your kids/spouse/partner/roomie.

This veggie-loaded Zucchini Fritter recipe is your answer to delicious veggies that you and your household will actually be excited to eat! They’re easy to prepare, and any extras are perfect for a quick reheat & eat anytime later in the week. In my house, we enjoy these fritters at any meal of the day, or even for a snack.

Keep the shredding step quick and easy by using a food processor! This is the one I use in my kitchen, and I love it.

But wait, there’s more!

Yes, more veggies. . . you can make these fritters with a variety of different veggies! It doesn’t have to be zucchini. This means you can use up all of those forlorn veggies in your fridge that have been, ahem, patiently waiting for you to finally eat them.

Building a meal with fritters

When adding these to a meal, I typically plate them with some additional protein (i.e. poultry, eggs & egg white scramble, Greek yogurt, seafood, tempeh, etc.), and little bit more slow carb such as fruit or a starchy veggie like squash or sweet potato. The fritter itself is, of course, a good source of non-starchy veggies, but also contains some slow carb (from the chickpea flour), a lil’ bit of protein (from the chickpea flour and the egg), and nourishing fat (from the avocado oil and the egg).

This meal combination works well for my needs, but please do what works for YOU. Your individual needs with regard to protein, carbohydrates and fat may vary, which means you might choose to build your plate differently than mine.

  • Add to your dinner or lunch plate for a delicious, filling, satisfying boost of veggies.
  • Add to your breakfast plate to start your day with some veggies (we love them plated with Trader Joe’s maple breakfast sausage on the side, and some Fage Greek yogurt and fresh fruit).
  • They are easy to pack up for a portable, balanced snack.

And if you have a garden and you are STILL trying to use up the last of your zucchini from this growing season, this is your ace in the hole. Just keep doubling the recipe until you’ve used up your last zucchini. That’s what I do!

Here’s the quick & dirty on this easy recipe: (full recipe below)

what you need:

  • shredded zucchini
  • a few dried herbs, salt
  • some flour (I used chickpea flour, which is a slow-acting carb, and also happens to be gluten-free. Experiment with whatever kind of flour suits you, honestly. It’s all good.)
  • egg
  • oil

what you do:

  • Shred zucchini, salt it, let it sit for a bit, and then wring it out.
  • Mix dry ingredients.
  • Add whisked egg, zucchini, and dry ingredients to bowl and combine.
  • Heat little bit of oil in skillet, and pan-fry mixture by the spoonful for a few minutes on each side.
  • That’s it. If you want to get extra about it, you can make a quick dipping sauce, too.
Print Recipe
Gluten-free Zucchini Fritters with Dipping Sauce
Course Appetizers, Breakfast, Salads & Side Dishes, Snacks
Servings
Ingredients
Zucchini Fritter batter
  • 1 lb zucchini shredded and pressed dry by wrining gently in clean kitchen towel (Shred with food processor or box grater. One pound of zucchini equals about 4 cups grated zucchini; or 2 cups of salted and squeezed zucchini)
  • 1/2 teaspoon onion powder
  • 1/2 teaspoon garlic powder
  • 1/2 teaspoon dried oregano
  • 1/2 teaspoon dried basil
  • 1/2 cup chickpea flour (Bob's Red Mill is my favorite.); Also known as besan flour, or experiment with flour of your choice
  • 1/2 tsp ½baking powder
  • 1 egg
  • 1 tsp kosher (or coarse) salt for grated zucchini
  • 1/4 tsp kosher (or coarse) salt to add to fritter mixture
  • ground black pepper
  • Avocado oil for pan frying
Dipping Sauce:
  • 1/2 cup Greek yogurt
  • ¼ avocado mashed (optional)
  • heavy splash of red wine vinegar or fresh lemon juice
  • salt and pepper, to taste
  • 1 garlic clove minced or pressed
  • salt and pepper
  • 1 garlic clove minced or pressed
Instructions
  1. In a large bowl, combine shredded zucchini with 1 teaspoon kosher (or coarse) salt. Set aside for ten minutes.
  2. Wring out shredded zucchini by bundling it in a clean kitchen towel or cheesecloth and gently squeezing OR by pressing in a colander. Do not skip this step! This ensures the perfect texture fritters (instead of watery, soup-y batter that won't cook properly).
  3. Combine zucchini with remaining fritter ingredients.
  4. In a large, heavy skillet, heat oil over medium high heat (until gently shimmering). Plop batter by spoonful into heated oil. Gently smooth flat with spoon. Optional (but highly recommended): Place a spatter guard over the pan.
  5. Cook 3-4 minutes each side. (Reduce heat to medium as needed.)
  6. Place on a paper-towel lined plate or platter to cool slightly before serving.
  7. Optional: Combine dipping sauce ingredients. Serve on side, for dipping or drizzling.

Filed Under: Featured, Recipes Tagged With: gluten free, gluten-free, plant-forward, vegetables, veggies, zucchini

Maple Tahini Dressing

By Jen

Tangy, creamy, and a hint of sweetness – this simple, easy dressing hits all the right notes. It’s just rich enough to pair well with the spartan crunch of cabbage and crisp apples (like in this Apple & Cabbage Slaw). It’s delicious over roasted chicken or roasted squash, as a salad dressing, or even as a dip for veggies. Honestly, I keep inventing ways to use this dressing over and over again, as it is definitely one of my favorites. Please leave me a comment and let me know all of the ways you’re enjoying this dressing!

The prep for this sauce is so simple that I encourage you to outsource the task to anyone who might be able to help you in the kitchen – your kids? spouse? significant other? roommate? Let your assistants lighten your load in the kitchen whenever possible!

Apple & Cabbage Slaw with Maple Tahini Dressing

Print Recipe
Maple Tahini Dressing
Course Sauce/Dressing/Spices
Servings
cups
Ingredients
  • 1 tablespoon apple cider vinegar
  • juice of a half lemon
  • 2 tablespoons maple syrup
  • 1 tablespoon soy sauce or tamari
  • 1/2 cup tahini
  • 2-3 tablespoons water (thin to desired consistency)
Course Sauce/Dressing/Spices
Servings
cups
Ingredients
  • 1 tablespoon apple cider vinegar
  • juice of a half lemon
  • 2 tablespoons maple syrup
  • 1 tablespoon soy sauce or tamari
  • 1/2 cup tahini
  • 2-3 tablespoons water (thin to desired consistency)
Instructions
  1. Combine ingredients in a medium jar or bowl, and whisk to combine.

Filed Under: Recipes Tagged With: gluten-free, vegan

Apple & Cabbage Slaw with Maple Tahini Dressing

By Jen

In the depths of winter, I find it hard to warm up to tender, leafy, summery salads. In fall and winter, I find myself craving a heartier crisp and crunch to my salads, and more robust flavors. This classic combination of crispy apples, crunchy cabbage, and toasted walnuts satisfies completely every time.

I especially find myself reaching for this recipe after the holiday season of rich foods. The bright, tangy flavors reawaken my palate after a steady diet of Christmas cookies and egg nog! Also, apples, cabbage, and walnuts are foods that naturally support liver function, which means you can skip the shady detox teas and detox supplements and just eat this tasty salad instead. 

This salad typically tastes best the day you prepare it, but there are some ways you can jump start your prep ahead of time.

JUMP START:

  • toast the walnuts
  • make the Maple Tahini Dressing (Even better – offload this task to someone else if possible. Conscript your kids, your spouse or significant other, roomate, whatever.)

If you’re going to spend time making this recipe, you might as well leverage your efforts and make a little bit extra of some of the ingredients to repurpose in other meals during the week. I like to call these my “Now & Laters” – I’m prepping some for now, and some for later use in other meals, with hardly any extra effort.

NOW & LATER:

  • In addition to the chopped apples for this salad, slice up an extra apple or two, and store in the fridge for snacks during the week. A little squeeze of fresh lemon will keep them from browning.
  • Good news: the dressing recipe included below yields plenty extra, which means you can store it in the fridge and enjoy it all week long. It’s delicious over roasted chicken or roasted squash, as a salad dressing, or even as a dip for veggies. 
  • Toast extra walnuts, and store in the fridge for adding a little sprinkle of tasty, crunchy healthy fats to your plate now and then. They’re great on your morning oats or Greek yogurt, or sprinkled on a salad or a bowl meal.
  • Slice/shred the remaining half head of cabbage, and repurpose it into a stir fry or a classic slaw the next day or two.
Maple Tahini Dressing

Print Recipe
Apple & Cabbage Slaw with Maple Tahini Dressing
Course Salads & Side Dishes
Servings
as a side
Ingredients
Slaw:
  • 1 large or 2 medium crisp apple, chopped
  • 1/2 medium - large head green cabbage, shredded or thinly sliced
  • 2 tablespoons toasted chopped walnuts
  • 4-6 small scallions, chopped
  • 2 or so tablespoons fresh parsley, chopped
Dressing:
  • 1 tablespoon apple cider vinegar
  • juice of half lemon
  • 2-3 tablespoons water (thin to your preference)
  • 2 tablespoons maple syrup
  • 1/2 cup tahini
  • 1 tablespoon soy sauce or tamari
Instructions
  1. Combine slaw ingredients in a large bowl.
  2. Combine dressing ingredients in a medium jar or bowl, and whisk to combine.
  3. Add Maple Tahini Dressing to the salad, and toss gently to combine. (I used about half of the dressing amount on the salad.)

Filed Under: Recipes Tagged With: gluten-free, vegan

Easy Homemade Nutella

By Jen

There’s nothing like a little bit of chocolate to brighten your day, especially when it’s blended with rich, roasted hazelnuts. Although this delicious spread definitely qualifies as a once-in-a-while treat, I feel a little better about this homemade version compared to store-bought Nutella. Instead of palm oil, this version here relies on simply hazelnuts and dark chocolate for fat. To minimize the sugar load a bit, I’ve used 85% dark chocolate, and just a smidge of maple syrup for sweetness. Honestly, I love the taste of super-dark chocolate (the less sweet the better!), so I often leave out the maple syrup when I make this for my own household.

Ready for gifting

This spread (dip? anything goes!) is the perfect simple, homemade food gift. Just be sure to double the recipe to have enough for yourself, too!

This quick, easy recipe requires just a few simple ingredients:

  • hazelnuts
  • dark chocolate
  • salt
  • vanilla extract
  • maple syrup

After the initial step of roasting the hazelnuts, you’ll dump them in your food processer and blend to a butter consistency. 

  • Just getting started . . .
  • It’s butter!
  • Time to add the melted chocolate, vanilla extract, and salt

It’s really up to you how to enjoy this decadent spread. It’s great on fruit, on these gluten-free waffles, swirled into plain Greek yogurt, or enjoyed just straight-up on a spoon! To be honest, I’m a big fan of the straight-up spoonful. 

Print Recipe
Easy Homemade Nutella
Course Desserts
Servings
cups
Ingredients
  • 3 cups raw or dry roasted hazelnuts (a 1 lb bag contains 3 cups of hazelnuts)
  • 1 3 1/2 oz. bar (or 100g) high-quality dark chocolate (70% or higher)
  • 1/4 teaspoon salt
  • 1 tablespoon real maple syrup (optional)
  • 1 teaspoon vanilla extract
Course Desserts
Servings
cups
Ingredients
  • 3 cups raw or dry roasted hazelnuts (a 1 lb bag contains 3 cups of hazelnuts)
  • 1 3 1/2 oz. bar (or 100g) high-quality dark chocolate (70% or higher)
  • 1/4 teaspoon salt
  • 1 tablespoon real maple syrup (optional)
  • 1 teaspoon vanilla extract
Instructions
  1. Preheat oven to 350F. Line a large baking sheet with parchment paper.
  2. Add the hazelnuts to the baking sheet, and spread into a single layer. If using roasted hazelnuts, roast for about 8 minutes. If using raw, roast for about 12-14 minutes.
  3. After hazelnuts have cooled slightly, grab a clean kitchen towel. Rub the hazelnuts in the dish towel to remove the skins. I usually do this in two or three batches. This step will not remove all of the skins, and that is absolutely fine.
  4. Add the hazelnuts to a food processor, and blend until they form a butter consistency (see photos above). This generally takes about 7 or 8 minutes.
  5. Break the chocolate into smaller pieces (no need to chop!), and melt in microwave or in a double-boiler. If using the microwave, heat the chocolate in 30-second or less increments and watch carefully.
  6. Add the melted chocolate, salt, and vanilla extract to the hazelnut butter in the food processor. Blend for a minute or so until ingredients are totally incorporated.
  7. Add the tablespoon of maple syrup (optional), and blend for an additional minute.
  8. Enjoy, share, or both!

Filed Under: Recipes Tagged With: chocolate, gluten-free

Gingerbread Spice Energy Bites with Collagen

By Jen

I have a confession to make. I’m pretty lazy when it comes to snacks. I typically don’t prep snacks, because I find it a lot easier to simply grab a small piece of fruit and some nuts or roasted seeds, no cooking or prep necessary. The holidays, however, having me feeling a bit inspired, though. Also, my kids are kind of bored with the fruit-and-nuts-every-single-day snack plan, so I developed this recipe for us all to enjoy something festive that would help us get out of our snack rut.

These cute, little energy bites will satisfy your craving for something sweet, and the yummy gingerbread spices will have you humming all of your favorite holiday tunes in no time. They also deliver a ton of nutrients thanks to fiber-rich dried plums, good fats from the cashews, and a small dose of collagen.

Once known as “prunes”, but since re-branded as dried plums, these powerhouses pack some serious antioxidant punch. In addition, dried plums’ combination of soluble fiber and the natural sugar sorbitol help keep things moving along in the digestive tract quite nicely, if ya know what I mean. Soluble fiber is also very effective at keeping blood sugar levels stable, increases your body’s sensitivity to insulin, and leaves you feeling satiated.

I included a couple of tablespoons of hydrolyzed collagen (a.k.a. collagen peptides or also collagen hydrolysate) in this recipe for a couple of reasons. First, it adds a small amount of protein to the energy bites. Second, collagen provides certain amino acids that our diets can often be lacking, even if we are eating adequate protein in general. There’s some evidence to indicate that collagen, in its variety of forms, confers a wide range of health benefits.

These no-fuss energy bites involve just a quick zip of four simple ingredients in your food processor. Feel free to double the recipe (honestly, you probably will want to eat a double batch of these). If you don’t have any gingerbread spice blend on hand (sometimes my local market stocks it), you can make a quick batch of this gingerbread blend. That recipe yields enough for this recipe, plus some extra to sprinkle on your morning oats, or in your coffee for a treat! And, if you want to skip making the blend, I listed in the recipe instructions the exact amount of each spice you’ll need to get you through just this recipe. You do you.

Process cashews until they take on a crumb-like texture.


Your dough will be ready for rolling when it looks like this. It should feel slightly tacky.


These are the cashews and prunes (er, dried plums) I often use for this recipe.


Print Recipe


Gingerbread Spice Energy Bites with Collagen

Course Snacks

Servings
energy bites


Ingredients
  • 3/4 cup raw cashew pieces
  • 15 bite-size prunes/dried plums (equivalent to approximately 2/3-3/4 cup)
  • 1 teaspoon gingerbread spice blend (store-bought OR 1/4 teaspoon each cinnamon, ground ginger, and allspice, plus 1/8 teaspoon each nutmeg and ground cloves)
  • 2 tablespoons collagen powder (a.k.a. collagen peptides, hydrolyzed collagen, or collagen hydrolysate)


Instructions
  1. Pulse cashew pieces in food processor until they take on a crumb-like texture (see picture).

  2. Add remaining ingredients, and process until it forms into a slightly tacky dough-like texture (see picture).

  3. Using a tablespoon or small, cookie-dough scoop, portion out dough a tablespoon at a time, and roll into balls. Store in the refrigerator.

Filed Under: Recipes Tagged With: dairy-free, gluten-free, grain-free

Quick & Easy Chili-Lime Spiced Shrimp, Cucumber, and Avocado Salad

By Jen

It’s true, I do love to cook, but, I’m also living in the real world. I don’t have hours of time to prepare meals, and I bet you don’t either. I also don’t want to rely on processed, nutrient-poor foods for the sake of convenience. That’s why I look for meals that meet my top three requirements:

  • real-food ingredients
  • quick and easy
  • delicious

This no-cook meal, Chili-Lime Spiced Shrimp, Cucumber, and Avocado Salad checks all the boxes! Little conveniences like frozen cooked shrimp and canned beans add up to huge time savings without sacrificing flavor. It’s loaded with veggies, and the shrimp and avocado will leave you feeling fueled and filled. I whipped this recipe together on the fly one day as I rummaged through my kitchen, putting together a few lunches to get me through the week. This meal packs well as a lunch, but is also perfect for a busy weeknight when you’re short on time and need a quick-prep dinner.

I like to round out this meal with some additional carbs (brown rice is my favorite with this). Yes, technically the cooked rice means this isn’t a 100% “no-cook” recipe, but, it can be if you rely on batch-cooked rice that you included in your weekly meal prep (yes, that’s often the secret to my no-cook meals!). If you choose not to add that extra carb, consider increasing the olive oil amount a little bit.

The directions below are for two servings. Feel free to dial up or down the servings to meet your needs. If you pack up a couple for lunches, it’s best to hold off and add the avocado the day you will enjoy your meal.

All packed up for lunch (variation here is refried beans instead of black beans)


Print Recipe
Quick and Easy Chili & Lime Spiced Shrimp, Avocado, and Refried Beans
Course Main Dishes
Servings
Ingredients
  • 6 ounces cooked, peeled, and deveined shrimp thawed from frozen (this can be done overnight in fridge, or rinse under cold running water for several minutes)
  • 4 teaspoons extra virgin olive oil
  • 1 medium avocado, pitted and cut into bite-size chunks
  • 1 cup cooked black beans (canned or home-cooked)
  • 1-2 tablespoons cilantro, chopped
  • juice of 1/2 lime
  • 1/2 large cucumber, chopped
  • 1 cup cooked brown rice (optional)
  • 1/2 small-medium red bell pepper, chopped
  • 4 scallions, chopped
  • handful cherry tomatoes, halved
  • dash salt
  • 1/4 teaspoon ground cumin
  • 1/4 teaspoon chili powder
  • dash ground coriander
  • dash ancho chili powder (optional)
Instructions
  1. Add all ingredients to a large bowl, and gently combine. Enjoy!

Filed Under: Recipes Tagged With: avocado, dairy-free, easy, gluten-free, protein, quick, quick and easy, seafood

Muffin-Tin Turkey Breakfast Sausage and Grain-Free Waffles

By Jen

Cook once, breakfast like a champ all week long

Nothing goes so perfectly with waffles* or pancakes than a tasty, protein-rich sausage patty, right? Most store-bought options for breakfast sausage are full of junk you really don’t want to be putting into your body (just take a gander at that mile-long ingredient list on the side of the box), but, fortunately, it’s easy-peasy to make your own with ingredients  you can recognize. This recipe is easy to double, which means it is a great staple recipe to keep on your meal prep rotation. These patties are a great addition to breakfast, to help ensure that you are starting your day with satiating, fueling protein! 

You have two options for making these patties – the muffin-tin method or pan-fried in a skillet. I prefer the muffin-tin method, as it makes for much easier clean up all around, especially with the silicone muffin pans I’ve been using lately (brand: Trudeau Maison, I found them at Target). 

*This grain-free, gluten-free waffle recipe is made with chickpea flour, and can be found in the book Always Hungry?: Conquer Cravings, Retrain Your Fat Cells, and Lose Weight Permanently by David Ludwig, M.D. It’s an amazing book that totally lives up to its title, and is backed by solid science. It’s full of great info, recipes, and meal plans. You can check out the original recipe here, along with a helpful video tutorial. Tip: Though the recipe directions state to separate the eggs (yolks and whites), I usually just add the eggs in whole, and it works fine. #Healthymadeeasy, right?

turkey sausage patties with gingerbread-spiced grain-free waffles, cinnamon apples, and dollop of whipped cream

Print Recipe
Muffin-Tin Turkey Breakfast Sausage
Course Breakfast, Main Dishes
Servings
Ingredients
  • 1 lb ground turkey
  • 1/2 - 1 tsp salt (depends on how salty turkey is already)
  • 1/4 tsp dried marjoram
  • 1/4 tsp dried thyme
  • 1 tsp ground sage
  • 1/8 tsp ground red pepper optional
  • avocado oil or high oleic safflower oil (for pan-fry method only)
Instructions
  1. Combine the spices and salt, and add to 1lb of ground turkey. Add the spice mixture a little bit at a time so it blends evenly.
  2. Muffin-tin method: Preheat oven to 350 degrees F. In a standard size muffin tin, fill all twelve wells about halfway each. I like to use an ice cream/batter scoop to make this go more quickly. Bake for approximately 20-22 minutes, or until the patties reach an internal temperature of 165F.
  3. Pan-fry method: Form into small patties, then pan fry them over low-medium heat in an ovenproof skillet in a little bit of oil to brown them (I used avocado oil). To ensure they are cooked all the way through, finish them in the oven for a few minutes at 350F, until they reach an internal temp of 165F.

Filed Under: Recipes Tagged With: batch cooking, gluten-free, grain-free, protein

Sloppy Joe Sweet Potato Boats

By Jen

While it can be exciting to try totally new foods and combinations, it’s also perfectly fine to stick with classic, comfortable favorites like these Sloppy Joe Sweet Potato Boats. In my house, with two teens, busy schedules make it a challenge to get everyone around the dinner table at the same time. So, if I can make the meal preparation part easier with a simple dinner like this, that makes everything else go more smoothly!

This comfort-food recipe is one of our fall and winter favorites. The sloppy joe mixture includes a hefty dose of onions and peppers, and with an added veggie side like a leafy green salad (or, my lazy veggie side pictured here – pickles!), it’s a well-rounded real-food meal that even a picky eater can appreciate.

Here are some ways you can jump start your prep ahead of time, to get this dinner on the table even more quickly:

JUMP START:

  • Chop the onion and pepper earlier in the week, and store in refrigerator until use.
  • Sweet potatoes can be cooked ahead and stored in refrigerator until use. A quick reheat is all they’ll need.

If you’re going to spend time making this recipe, you might as well leverage your efforts and make a little bit extra of some of the ingredients to repurpose in other meals during the week. I like to call these my “Now & Laters” – I’m prepping some for now, and some for later use in other meals, with hardly any extra effort.

NOW & LATER:

  • The sloppy joe mixture freezes very well, so consider doubling that part of the recipe, so you can store a batch for a quick dinner another time. A 12-inch or larger skillet is best to use if doubling the recipe.
  • Throw extra sweet potatoes on the baking sheet, which will give you enough for another dinner later in the week, or to have with eggs at breakfast, or to tuck into a lunchbox or burrito bowl.
  • Wondering what to do with the rest of that tomato paste in the can? Scoop it out in tablespoon-size portions on a baking sheet or dish, and place in freezer. Once they’re frozen, remove from dish, and store them in the freezer in a container or ziploc bag. Let’s face it, you typically only need a tablespoon or two in a given recipe, so why buy a new can each time? This saves you the hassle of shopping for it over and over again.
Jen prepping sweet potatoes for the oven.
prepping sweet potatoes for the oven . . . with extra to use later in the week

Print Recipe
Sloppy Joe Sweet Potato Boats
Course Main Dishes
Servings
Ingredients
  • 1 lb ground beef (If possible, choose grass-fed. I typically use 85% lean or 90% lean.)
  • 1 tbsp oil (I used extra virgin olive oil.)
  • 1 1/4 tablespoons honey
  • 2 teaspoons Montreal seasoning Check label for “clean” ingredients. My favorite one is from Teeny Tiny Spice Company.
  • 1 medium onion chopped
  • 1 small red bell pepper chopped
  • approx. 2 cups tomato sauce canned, not marinara
  • 2 tablespoons tomato paste
  • 1 tablespoon red wine vinegar
  • 1 tablespoon Worcestershire sauce
  • 2 medium sweet potatoes scrubbed clean and cut in half lengthwise
Instructions
For the Sloppy Joe mixture
  1. Heat a large skillet over medium-high heat. Add oil and beef to the pan, spreading it around the pan to break it up. Add honey and Montreal seasoning, and stir to combine.
  2. When the meat has browned, add the onion and red pepper.
  3. Reduce heat to medium and cook for five minutes.
  4. Add vinegar, stirring briefly to reduce, then add Worcestershire sauce, tomato sauce and paste, stirring to combine.
  5. Reduce heat to simmer and cook Sloppy Joe mixture five minutes longer.
  6. Serve each portion of meat on ½ cup or so of baked sweet potato. If you want the "boat" effect, scoop out a bit of the potato to form a boat shape which is perfect for holding the sloppy joe meat. The extra, leftover sweet potato can be reserved for another meal.
For the sweet potatoes
  1. Preheat oven to 400F. Line a baking sheet with parchment for easier clean up.
  2. Rinse potatoes and scrub clean. Cut in half lengthwise.
  3. Rub cut side with a little bit of oil, and then season with salt and pepper (or for any extra potatoes, add your favorite spices).
  4. Place cut side down on baking sheet, and bake for about 30 minutes (until soft).

Filed Under: Blog, Recipes Tagged With: comfort food, gluten-free, sloppy joes

Slow Cooker Pork Carnitas and Taco Slaw

By Jen

If you need to feed a crowd and want to keep everyone happy AND keep yourself on track, this is your solution! Throw this in the slow cooker while you enjoy some pregame chill-time. Serve it buffet-style with some easy-peasy taco slaw (recipe below) and a choice of add-ons: black beans, brown rice, avocado, tomatoes, sour cream, lime wedges, tortillas. Whatever your guests’ needs – gluten-free, dairy-free, slow-carb, low-carb, all-the-carbs – everyone is covered! Buffet-style entertaining is an easy way to keep yourself on track with real food, fat-burning meals without having to prepare two different meals.


If you’re looking to stay lean or get lean and keep cravings in check, include some protein, fat, and slow-burning carbs on your plate. For this meal, your best bet would be pork, some avocado or sour cream, a hefty pile of the slaw, and some beans. Skip the processed carb tortillas, and if you really want some rice, keep the portion small.
For the carnitas recipe, check out http://fitmencook.com/slow-cooker-pulled-pork-carnitas/


Print Recipe


Taco Slaw

Course Main Dishes, Salads & Side Dishes
Cuisine Mexican

Servings


Ingredients
  • 1/2 head cabbage, thinly sliced (or shred using food processor)
  • juice of one lime
  • big handful of chopped cilantro
  • 1/2 medium red onion thinly sliced
  • salt and pepper
  • 2 tablespoons oil (For this recipe, I use high-oleic safflower oil or avocado oil.)
  • a dash ground cumin


Instructions
  1. Combine all ingredients.

Filed Under: Recipes Tagged With: buffet, entertaining, gluten-free

Primary Sidebar

About Me:

Hi, I’m Jen, and welcome to Nourished Not Famished. Here you’ll find recipes, meal ideas, and wellness tips to thrive without deprivation or restriction. I like to keep healthy changes simple, and grounded in a real-life approach (the secret to making it stick!).  Find out about more about me here, and how you can work with me!

Get updates via email

* indicates required
Website sign up

Searching for something in particular?


Instagram

🍋 Greek-inspired Shrimp Bowls! Ready for someth 🍋 Greek-inspired Shrimp Bowls! Ready for something fresh, citrus-y, crisp, and cool? 🌞 Lemon, feta, and dill bring a bright, herb-y tang to this nourishing and tasty lunch (or dinner). Hit save to make this one soon!

When life gets busy, it's easy to let meals go by the wayside. Keep your energy levels up and your mental focus dialed in by packing your plate with foods that *satisfy* and boost your energy: 
protein, healthy fats, veggies (and/or fruits) and slow-acting starchy carbs. 

Quick and easy gets the job done! This lunch (or dinner) is mostly a no-cook meal, except for the starchy side (which came from my meal prep - see deets below). .
#whatsonmyplate (each serving)
➡️ thawed pre-cooked shrimp
➡️ about a half cup chickpeas
➡️ cucumbers and cherry tomatoes
➡️ about 2 tbsps feta
➡️ 1 tbsp EVOO
➡️ about 2 tbsp chopped fresh dill
➡️ fresh lemon juice, salt & pepper, and a dash of za'atar spice
➡️ about a half cup (already cooked) quinoa (hiding underneath)
.
.
#fastfood #balancedplate #powerplate #poweryourplate #poweryourlife #simplenutrition #nourished #lunch #whatsfordinner #nourishednotfamished #ditchthediet #protein #fat #carbs #slowcarbs #recipe #mealprep #honoryourhunger #batchcooking 
.
.
.
.
.
So, you're feeling motivated to make some healthy So, you're feeling motivated to make some healthy changes. Yay, You! 🎉👏👏👏 The secret to making it all happen is . . . there is no secret. The unsexy truth is real change happens (and sticks!) through long-term consistency with the basics.

Nope, the Six-Week Shred plan isn't the magic bullet some huckster is trying to tell you it is. 

It's all about practicing the basics, with a focus on *making them happen in a way that works for you today, this week, this month*. 

And knowing that "what works right now" will change over time.

That's where the Practice Mindset helps! 👇
1️⃣ Practice a small change for a set period of time.
2️⃣ Next, pause and reflect: How did it go? What worked, what didn't, and why?
3️⃣ Proceed if it's working, or Pivot if needed (tweak the change to better fit your life).

Those unsexy basics to practice?
👉Eat more whole (or minimally refined) foods,.and less of the highly refined stuff. (Notice that I didn't say "none"?)
👉Balance your plate at meals with protein, healthy fats, and carbs. Keep it colorful, with plenty of plants in the mix.
👉 Sleep, rest, recover.
👉 Do what you can to manage stress.
👉 Move your body daily (walking is great!). Build your strength. #makesomemuscle
👉 Spend some time doing fun things that help you connect with yourself. #selfcare
👉 Get outdoors. Natural light, Vitamin D, fresh air, and nature are key. (You are a living thing, remember? 😉)
👉 Connect with people and experiences that nourish you.

Hit up my blog (link in bio @nourished.not.famished ) for ideas, tips, and resources to help you get cracking on practicing those unsexy basics. 😘

Which of these basics is your practice priority right now? How's it going?
.
.
#makeitstick #tinyhabits #healthyhabits #practicenotperfection #nourishednotfamished #skillpower NOT #willpower
#changeskills #eatingskills #kitchenskills #balancedplate #simplenutrition #movement #sleep #stressrelief #ditchthediet  #resistancetraining #strength #metabolichealth #fitover40 #fitover50
.
.
.
.
Reminder📣. . . these un-sexy, SIMPLE basics ge Reminder📣. . .  these un-sexy, SIMPLE basics get the job done! Not just during the holidays, but *all year long*. And simple is just what you need right now, isn't it?

Why do they work? 
👉 Because all of these habits focus on *giving yourself what you need to thrive*. 🌱 

I invite you to try this:
👉Spend a few months TRULY practicing these simple habits most of the time. Start with just one, or a few (✨Start small, and add as you feel ready.✨)
👉TIP: Sleep is a great one to start with, because it's the foundation that holds up everything else. 

As you practice these habits, pause and observe:
🤔How do I feel? 
🤔How am I performing, physically and mentally? 
🤔How is my energy?
🤔How do my clothes fit?
🤔How have my longer-term health indicators like blood pressure, cholesterol levels, and blood glucose levels changed?

If you truly desire healthy changes that
✔️feel sustainable
✔️ yield results
✔️ and STICK,
stop relying on willpower!

🌟Focus your efforts on *meeting your needs*, rather than restricting and depriving.🌟
.
Stay in a groove with these habits this month, and you might just discover come January 1st that you feel ready to tackle the new year, no over-the-top diet and intense workout plans necessary! 

👉By then, you'll have already established the habits you need that let your biology work for you for optimal wellness, instead of relying so heavily on willpower.👈

Who's with me?! Will you be KISS-ing your way through the holiday season?? 

#mistletoe #healthyhabits #nourishednotfamished #tinyhabits #atomichabits #wellness #healthy #balancedplate #sleep #stressrelief #circadianrhythm #movement #everythingisconnected #holidays #december #protein #veggies #christmas #nourished #honoryourhunger #ditchthediet #fitover40 #fitover50
The most delicious form of self care: meal prep. 💕 (See stories for deets on this Turmeric Pepper Chicken & Asparagus!) 

During this busy holiday season, your needs often end up on the back burner. 
Which can leave you feeling hangry, exhausted, and ravenous by the end of the day. 
(You know, that feeling when you walk in the door and dive head-first into the bag of chips? #beentheredonethat 🤷‍♀️)

Packing up a few nourishing lunches is a surefire way to boost your midday energy during the week, and leaves you feeling *satisfied* at lunchtime. 

👉 You don't have to make fancy, fussy recipes.
👉 Instead, keep it simple & balanced by packing a lunch container of some protein, fat, carbs, and veggies and/or fruit. Leftover dinner is a great shortcut! 
👉 If takeout is part of your lunch plan, be strategic about ordering meals that will actually nourish you (yup, that means protein, fat, carbs, and veggies and/or fruit).

Is lunch a pain point for you, too?

Would you love the convenience of having it all ready ahead of time?

✨For lunch ideas 
and my top picks for leakproof lunch containers, 
check out my website at link in my bio @nourished.not.famished ✨

Head to "My Favorite Things" section of my site for my top container picks! 

#lunch #whatsforlunch #realfoodfastfood #mealprep #balancedplate #simplenutrition #ditchthediet #tinyhabits
#healthyhabits #poweryourlife #eatingskills #kitchenskills #plantforward #omnivore #fitover40 #fitover50 
.
.
.
.

Copyright © 2023 · Nourished Not Famished